Knots & Rigs
How to Tie an Improved Clinch Knot
Learn the improved clinch knot step by step — the go-to freshwater knot for tying a hook, swivel, or lure to mono or fluorocarbon line.
Ask almost any freshwater angler which knot they tie most often and the improved clinch knot is near the top of the list. It is fast to tie, holds well on monofilament and fluorocarbon, and requires no tools beyond your fingers and a little water. If you are just getting started, this knot alone will cover most of the hookups you make all season.
This guide walks through each step clearly, explains why certain details matter (wraps, lubrication, seating direction), flags the common mistakes that kill the knot's strength, and answers the questions beginners ask most.
What the Improved Clinch Knot Is For
The improved clinch knot connects your line directly to terminal tackle, a hook eye, swivel, snap, or split ring. It is the workhorse knot for:
- Tying a hook when fishing live or cut bait
- Attaching a lure with a fixed eye (spinners, spoons, jigs)
- Connecting to a barrel swivel at the bottom of a leader
- Hooking up a snap or snap-swivel before changing lures quickly
The "improved" version differs from the basic clinch knot by one extra step: after you pull the tag end through the loop beside the eye, you also thread it back through the large loop you just created. That second tuck roughly doubles the knot's resistance to slipping under load. Skip it and you have a plain clinch, functional, but less secure.
Mono vs. Fluorocarbon vs. Braid
The improved clinch knot excels on monofilament (6–20 lb test) and fluorocarbon. Both materials have enough stretch and surface texture to lock the coils in place when the knot seats.
On braided line the story changes. Braid is slick and has almost no stretch, so a clinch knot tends to slip before it cinches, especially in heavier weights. For braid, a Palomar or Uni knot grips better. If you are fishing a braid-to-fluorocarbon leader setup, tie the clinch on the fluoro leader end, not the braid. See our guide on the Palomar knot for braid-friendly tying.
What You Need Before You Start
Nothing special, just your rod and reel with line on it, your hook or lure, and a pair of nippers or small scissors to trim the tag end afterward. That is it.
One tip before you begin: if you are learning for the first time, practice with a thicker cord or paracord first. Seeing the wraps and loops at a larger scale makes the steps clearer than trying to learn on 10 lb mono for the first time.
Step-by-Step: Tying the Improved Clinch Knot
Work slowly the first few times. Once the muscle memory is there, the whole knot takes about fifteen seconds.
Step 1, Thread the Tag End Through the Hook Eye
Pull 8–10 inches of line off your reel so you have enough to work with. Pass the tag end (the free end) through the hook eye from the front. Pull it through until you have about 6 inches of tag end extending past the eye.
Step 2, Wrap the Tag End Around the Standing Line
Hold the hook between your thumb and index finger. With your other hand, wrap the tag end around the standing line (the line running back to your rod). Make five to seven wraps, winding away from the hook eye toward your rod. Keep the wraps snug but do not overlap them, each coil should sit neatly against the next.
How many wraps? Five turns is standard for lines in the 10–20 lb range. For lighter lines (4–8 lb) add a turn or two (six to seven wraps) because thinner diameter mono benefits from extra coils. For heavier mono above 20 lb, five wraps is plenty; more coils can bunch up and actually weaken the knot.
Step 3, Thread the Tag End Back Through the First Loop
You will notice a small loop right next to the hook eye, between the eye and your first wrap. Thread the tag end through that loop, from the hook-eye side, pulling it away from the hook.
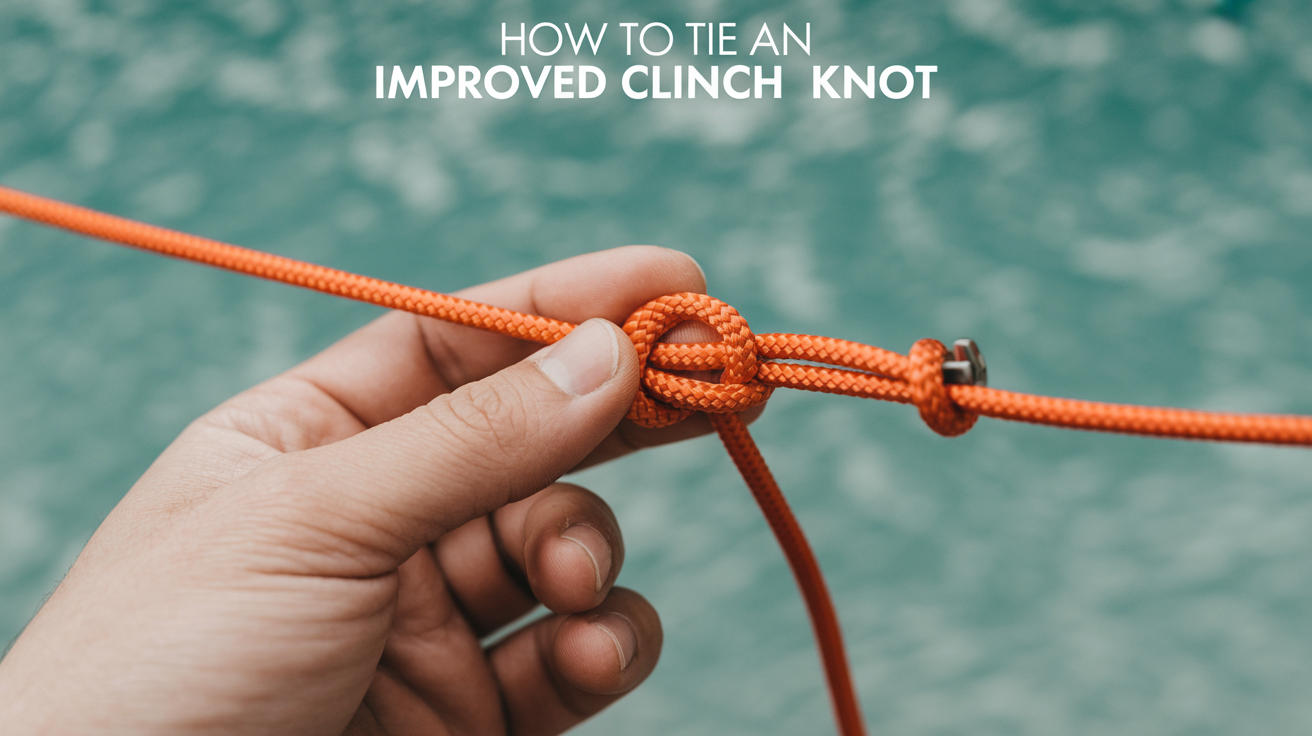
Step 4, Thread the Tag End Through the Large Loop (the "Improved" Step)
After completing step 3, a larger loop has formed between the coils and the tag end. Pass the tag end through this big loop, from front to back. This is what separates the improved clinch from the basic clinch. Without this step you lose a significant portion of the knot's holding strength.
Step 5, Wet the Knot
Before you pull anything tight, wet the entire knot with saliva or water. Friction generates heat as the coils compress, and heat weakens nylon monofilament. Wetting the knot lets everything slide together smoothly and seat evenly. This single habit makes a real difference in how much of the line's rated breaking strength the knot retains.
Step 6, Seat the Knot by Pulling Both Ends
Hold the hook firmly in one hand and pull the standing line with the other, pulling away from the hook. The coils should roll down toward the eye and compress into a tight, uniform barrel. As tension builds, give the tag end a gentle tug to confirm the lock has set. The knot should feel solid and immovable at the eye.
Step 7, Trim the Tag End
Use nippers to trim the tag end close to the knot, roughly 1/8 inch (about 3 mm) is fine. Leave a small stub rather than cutting flush; if the knot ever starts to slip, that stub gives you a visual warning before the connection fails completely.
Seated Correctly vs. Incorrectly
A properly seated improved clinch knot looks like a neat, tight barrel of coils sitting against the hook eye. The coils are evenly spaced and parallel, not twisted or crossed. The tag end exits cleanly from the last coil.
Signs the knot did not seat:
- Coils have gaps or are bunched at one end
- The loop beside the eye is still visible and open rather than compressed
- When you pull the standing line, the knot slides along rather than holding firm
If any of these show up, cut the knot off and retie. A poorly seated improved clinch knot will fail under less stress than the line itself, which defeats the point.
Common Mistakes That Weaken the Knot
Skipping the lubrication. Dry mono grinding against itself heats up and weakens the fibers. Always wet it first.
Fewer than five wraps. Four wraps or less reduces the surface area holding the coils in place. Use at least five for typical mono, more for light line.
Missing the second tuck (step 4). Forgetting to thread the tag end through the large loop leaves you with a plain clinch knot. It still works, but it is markedly less secure. Check this step every time until it is automatic.
Crossing wraps. If the coils overlap each other as you wind, they create uneven pressure points that can cause the knot to fail in a specific spot rather than distributing load across all five wraps. Keep each wrap separate.
Pulling the tag end only. Seating the knot by yanking just the tag end can tighten the coils unevenly. Pull the standing line toward the hook while holding the tag end, that forces the coils to compress in the right direction.
When to Choose a Different Knot
The improved clinch knot handles the majority of freshwater situations, but it is not always the best choice:
- Braid to terminal tackle: Use a Palomar or Uni knot, the clinch slips too easily on slick braid.
- Loops: If you want lure action enhanced by a loop connection (for topwater plugs, for instance), a loop knot like the non-slip mono loop suits better.
- Heavier leader material (25 lb+): Heavy, stiff fluorocarbon is hard to coil tightly. A Palomar is easier to tie and just as strong.
For a broader look at which knot fits which situation, see our overview of 5 fishing knots every beginner should know.
Using the Improved Clinch With Rigs
The knot connects the terminal end of any rig where you have monofilament or fluorocarbon meeting an eye.
On a Texas rig, for example, you typically run a bullet weight on the main line, tie on a wide-gap hook with an improved clinch, and rig a soft plastic through the hook. The knot sits at the hook eye and handles the shock of the hookset. Our guide on how to tie a Texas rig covers the full setup if you want to put the knot to work immediately.
For a simple hook-and-bobber panfish setup, tie a size 6 or 8 Aberdeen hook to 8 lb mono with a six-turn improved clinch and you have a reliable connection that will outlast several fish.
FAQ
How strong is the improved clinch knot compared to the line's rated strength?
Tied correctly on monofilament, the improved clinch knot typically retains 90–95% of the line's rated breaking strength. The plain clinch (without the second tuck) runs lower, often 70–85% depending on how it seats. Braid reduces that figure significantly because of how slick it is, the coils slip before the line fails.
Can I use this knot on fishing line heavier than 20 lb?
It works on heavier line, but stiff, thick mono and especially heavy fluorocarbon are harder to coil neatly. The wraps tend to bunch rather than lay flat. Above about 20–25 lb test, many anglers switch to a Palomar knot, which only requires a simple overhand knot and a loop pulled over the hook, easier to execute in cold hands or dim light.
How do I know the knot is fully seated?
A seated improved clinch knot does not move. The coils should look like a tight, compact barrel pressed against the eye. Tug the standing line hard with the hook held in your other hand, the knot should not budge or compress further. If you feel any slipping or see the coils shifting, the knot has not fully seated and should be retied.
Does it matter which direction I thread the tag end through the eye?
Thread it front to back (hook point facing you, thread toward you). The direction affects which side the coils form on and how cleanly the knot seats against the eye. It is a minor point, but keeping it consistent makes the steps faster and more repeatable.
Why does my knot break at the eye instead of at the wraps?
Breaking at the eye usually points to one of two things: the knot did not seat fully (the coils are unevenly loaded, so the line cuts against the eye on one side) or the line was abraded at the eye before tying. Check the last inch or two of your line before retying, if it feels rough or looks kinked, cut it back to fresh line and try again.