Cleaning & Conservation
How to Clean and Fillet a Fish: A Step-by-Step Guide
Learn how to fillet a fish cleanly and safely, from the first cut behind the gill to removing pin bones. Covers panfish, bass, catfish, and trout.
You've caught a fish worth keeping. Now what? Cleaning and filleting looks intimidating the first time, but the process breaks down into a handful of straightforward cuts. With a decent knife and a firm surface, most freshwater fish can be filleted in under five minutes once you have the muscle memory. This guide walks through every step, from setting up your workspace to pulling the last pin bone, along with notes on how different species require slightly different handling.
Before you keep any fish, confirm it meets the size and creel limits for your water and species. Those rules exist for good reasons and they change from state to state and season to season. See our plain-English breakdown of fishing regulations, limits, and seasons if you need a refresher on how to look them up.
What You Need Before You Start
Getting the right tools on the table before you make the first cut saves frustration later.
The Knife
A flexible fillet knife is the right tool for this job. Flexible means the blade bends when you press it against the rib cage, which lets you follow the curve of the bones without gouging deep into the flesh. Blade length matters by fish size: a 6-inch blade handles panfish and bass up to a couple of pounds; a 7- to 9-inch blade gives you reach for larger catfish, walleye, or pike. The knife needs to be sharp. A dull fillet knife tears flesh and makes every cut harder to control. Strop it before each session if you use a ceramic rod, or run it through a pull-through sharpener.
A fillet glove (cut-resistant) on your non-dominant hand is worth the few dollars. Fish are slippery, your knife is sharp, and accidents tend to happen when you're rushing.
The Workspace
A dedicated cutting board that you use only for fish helps with odor and cross-contamination. Many anglers keep an older plastic board in the boat or tackle bag for this purpose. You'll also want:
- A cooler with ice to store fillets immediately
- Paper towels or a clean rag
- A trash bag or bucket for carcasses and offal
- Running water if available, or a bucket of clean water for rinsing
Cold is your friend throughout this process. The sooner you get flesh onto ice after the kill, the better the texture and flavor. For more on keeping fish in peak condition from the moment you land them, read our guide on how to keep fish fresh after you catch them.
Killing the Fish
If you're keeping a fish, dispatch it quickly and humanely rather than letting it suffocate on a stringer or in a livewell for hours. A firm rap to the top of the skull with a club or the spine of a heavier knife is fast and effective. This is called percussive stunning and it's far more humane than slow asphyxiation.
How to Fillet a Fish: Step by Step
This method works for most common freshwater species, bass, crappie, bluegill, walleye, perch, and similar fish. Species-specific notes follow in the next section.
Step 1: Position the Fish
Lay the fish flat on the board with its back (dorsal side) facing away from you. The head should be toward your non-dominant hand so your cutting arm can move away from your body.
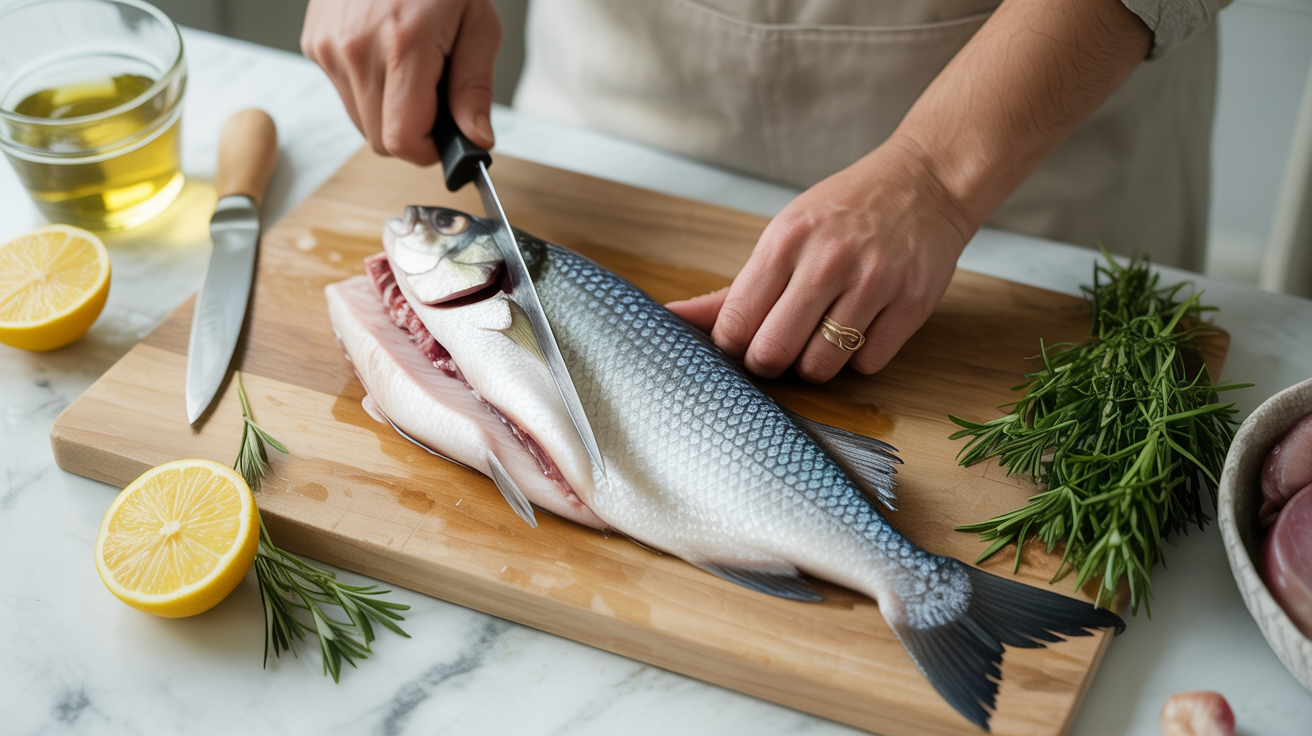
Step 2: Make the First Cut Behind the Gill Plate
Hold the fish firmly just behind the pectoral fin. Angle your knife at roughly 45 degrees toward the head, and slice down until you feel the backbone. Do not cut through the backbone. This cut frees the top of the fillet from the head without wasting the shoulder meat.
Step 3: Cut Along the Spine
Rotate the knife so the blade faces the tail and lies nearly flat, parallel to the cutting board. Keep the blade pressed lightly against the top of the backbone. Using long, smooth strokes, cut from the head toward the tail, letting the spine guide your blade. You will feel the blade riding over the ribs. Do not press down hard, let the flexible blade follow the contour.
Continue until the fillet is attached only by the skin at the tail, or cut it fully free. Flip the fish and repeat on the other side.
Step 4: Remove the Rib Cage
Lay each fillet skin-side down. You can see the rib bones fanning across the forward portion of the fillet. Slide the blade under the ribs at the top edge and follow the curve downward in one smooth cut, angling the blade slightly upward so you lose as little meat as possible. On small panfish this section is thin enough that many people simply eat through the softened ribs after cooking, your call.
Step 5: Skin the Fillet (Optional but Common)
If you want skinless fillets, keep the fillet skin-side down. Hold the tail end of the skin firmly with your non-dominant hand (a paper towel gives grip on slippery skin). Angle the blade almost flat against the board, just above the skin, and use a gentle sawing motion while pulling the skin backward. The goal is to leave as little flesh on the skin as possible. Some anglers skip this step and remove the skin after cooking, when it peels off easily.
Step 6: Remove Pin Bones
Run your fingertip along the center line of the fillet from head end toward tail. You will feel a row of small pin bones poking up through the flesh. These are the intramuscular bones that sit along the lateral line. Use needle-nose pliers or dedicated pin bone tweezers to pull them out at a slight angle in the direction they lean (toward the head). On bass and walleye there are typically 10 to 15 of them. On larger fish the bones are easier to find; on small panfish they are fine enough that most people ignore them or let heat dissolve them during cooking.
Step 7: Rinse and Chill
Give the fillets a quick rinse in cold water, pat dry with paper towels, and get them on ice or into a zip bag submerged in ice water right away. Do not let them sit at room temperature.
Gutting and Scaling Whole Fish
Some people prefer to cook panfish or trout whole rather than fillet them. The process is different.
Scaling: Hold the fish by the tail. Drag the back of a spoon or a scaling tool from tail toward head against the grain of the scales. Work under running water if possible because scales scatter. Rinse thoroughly when done.
Gutting: Insert the tip of your knife into the vent (the small opening near the tail on the belly side) and cut forward toward the gills, staying shallow to avoid puncturing the gut cavity. Spread the cavity open, reach in, and pull the viscera out in one motion. Use your thumbnail or the knife tip to clear the dark bloodline running along the spine inside the cavity. Rinse the cavity thoroughly with cold water. The bloodline carries a strong flavor; removing it improves the taste of the cooked fish.
Removing the head: Cut straight down just behind the gill plate. Some people leave the head on for presentation; others remove it to save cooler space.
Species Notes: How Different Fish Change the Process
The basic steps above apply broadly, but each species has quirks worth knowing.
Panfish (Bluegill, Crappie, Perch)
Small fish require short cuts. A 6-inch flexible blade is ideal. The rib cage on a hand-sized bluegill is narrow and easy to clear in a single pass. Pin bones in small panfish are fine and numerous; many anglers skip removing them and cook the fish whole or accept the bones, which soften with heat in fried preparations. Scaling before filleting is worth it if you plan to cook them whole.
Largemouth and Smallmouth Bass
Bass fillet cleanly with the standard method above. The rib cage is moderate in size and the pin bones are large enough to find and pull easily. Bass skin has a mild flavor and many cooks leave it on. Note that in some waters, particularly older impoundments and urban fisheries, bass may carry consumption advisories for mercury or other contaminants. Check your state fish and wildlife agency's consumption guidelines for the specific water you're fishing before eating fish regularly from any one location.
Catfish
Channel and flathead catfish have no scales, which simplifies the exterior work. However, they have firm, tough skin that is difficult to remove from raw fillets. Many catfish cooks fillet them with the skin on, then remove the skin after cooking when it peels off cleanly. Watch out for the pectoral and dorsal spines before you grab a catfish, they are sharp and can puncture skin. Hold the fish from behind the pectoral spines or use a wet rag for grip.
Larger catfish (above 5 or 6 pounds) benefit from a heavier, slightly stiffer fillet knife because the backbone is thick. The rib cage is broader than on bass, so the rib-removal pass takes more material.
Trout
Rainbow and brown trout have soft, moist flesh that tears easily if you rush. Use a sharp blade and let the flexibility do the work. Trout have a pronounced bloodline (a dark strip running along the spine inside the body cavity) with a strong, oily flavor, clear it out when you're cleaning whole fish, and trim the center section of the fillet if you notice a dark strip after skinning. Pin bones in trout run along the lateral line and are easy to pull with pliers. Trout skin has a pleasant mild flavor and many recipes call for leaving it on.
Food Safety and Keeping Cold
A fish that sits at 40°F or below stays fresh for two to three days in the refrigerator after cleaning. If you're not cooking within that window, freeze fillets in zip bags with as much air pressed out as possible. Vacuum sealing extends freezer quality to six months or more.
A few firm rules:
- Never let raw fillets sit at room temperature for more than two hours (one hour if the air is above 90°F).
- Rinse your cutting board and knife with hot soapy water immediately after finishing. Fish odor compounds bond to surfaces quickly.
- Don't mix cooked and raw fish on the same board without washing between uses.
- If you're pregnant, nursing, or feeding young children, check your state's fish consumption advisories. Many states publish specific guidance on species, size, and frequency for sensitive populations.
For broader guidance on handling fish you plan to release, see our guide on catch and release and how to do it so fish survive, because not every fish you catch needs to come home.
Reducing Waste and Using the Whole Fish
The carcass left after filleting is not garbage. Fish frames (the spine and attached meat) make excellent fish stock. Simmer the frame with onion, celery, and a bay leaf for 30 to 40 minutes, strain, and freeze the broth in ice cube trays. It adds depth to chowders, rice dishes, and sauces.
The cheeks of larger bass, walleye, and catfish are small, round pockets of sweet, firm meat that many anglers overlook. Use a small paring knife to cut them out from the depression below the eye socket. A pound of walleye cheeks is considered a delicacy in the upper Midwest.
Viscera and carcasses go straight into a sealed trash bag or buried at least 6 inches deep if you're in a remote area. Never leave fish offal at a boat launch or trailhead, it draws wildlife, creates odor problems, and is inconsiderate to other users.
FAQ
Do I need an expensive knife to fillet fish?
No. A dedicated flexible fillet knife in the $20 to $40 range does the job well if it's sharp. The two things that matter most are blade flexibility (so it bends against the ribs) and a sharp edge. A stiff chef's knife will work in a pinch but you'll lose more meat at the rib cage.
Can I fillet a fish while it's still alive?
Most anglers dispatch the fish first. Filleting a live fish is more difficult because the body flexes against your cuts, you risk injury from the fish thrashing, and it's needlessly hard on the animal. A quick blow to the skull takes seconds and makes every subsequent step easier.
How do I get rid of the fishy smell on my hands and board?
Rubbing your hands with the cut side of a lemon or with a small amount of white vinegar before washing with soap cuts through the odor better than soap alone. For cutting boards, a paste of coarse salt and lemon juice scrubbed in, then rinsed, works well. Plastic boards can go in the dishwasher.
My fillets have a dark strip down the center. Is that normal?
Yes. That's the bloodline, a strip of dark, fatty flesh that runs along the lateral line. It has a stronger, sometimes bitter flavor compared to the rest of the fillet. Many cooks trim it out with a V-cut before cooking. It's safe to eat but most people find the flavor off-putting, especially in larger, older fish.
How long do fresh fillets last in the freezer?
Properly sealed fillets frozen at 0°F or below hold quality for three to four months in a zip bag with air squeezed out, and six months or longer in a vacuum-sealed bag. After that they're still safe but texture and flavor decline. Label bags with the species, water, and date so you use older fillets first.